
Technical Perspective Continued
Last posting quickly outlined the principles of one point perspective. The key points included:
- Every picture has a horizon
- An object’s relationship to the horizon creates the illusion of a perspectival view of the scene to the viewer
- The vanishing point is the point where a viewer’s sight is limited to
The previous posting used a simplified fir tree as the subject. It is true that every picture has a horizon and involves the vanishing point, but it must be mentioned that natural phenomena, such as mountains, rivers, trees and bushes, are all very forgiving regarding perspective. These forms are organic and do not involve straight lines, and furthermore, viewers will accept a very wide range of sizes and shapes in their representation. This aspect of the inanimate, natural phenomena makes landscape painting and drawing much easier than works which involve architecture, humans or animals. Traditionally, landscape painting has been considered the third lowest form of painting on account of the relative simplicity of the pursuit.
This posting will outline the fundamentals which lead to understanding how to draw geometric shapes in perspective.
As mentioned before, the initial step to drawing a geometric shape in perspective is mastering the ability to draw a perfect square, appearing as if it were laying flat on an imaginary surface. This challenge is essential for revealing how an artist begins to create the illusion of space within a drawing.
Andrew Loomis does not break this task down for us, and many artists will be able to do this, merely with their eyes. I personally find it very easy to draw a perfect square laying on an illusionary ground on any angle. This is because I can visualize the correct placement and degree of the angles from the years of experience which I have integrated.
For the sake of the artists who do not find this easy, I have devised a simple method of finding the correct angles needed to draw a laying square from any position of perspective.
The Lesson
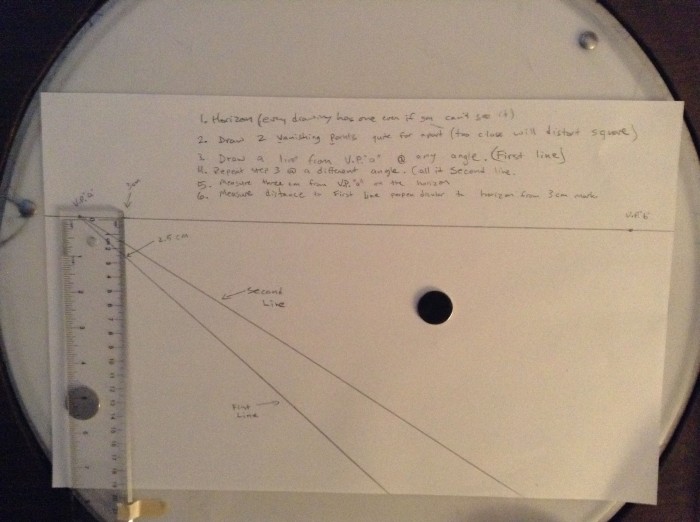
- Draw a horizon, and keep it towards the top third of your paper. Every drawing has a horizon.

- This time, we will use 2 Vanishing Points. Place them far apart. Putting the V.P.’s too close together will create distortions in your perfect laying square. The left hand V.P. will be “a”, the right hand V.P. will be “b”.

- Now, we draw a line at any angle from V.P. ‘a’, such that it crosses an imagined point between your two V.P.’s. This line we will call the First Line.

- Now we will repeat the previous step, but this time using a different angle of trajectory. We will call this line, Second Line.

- Now, for the next step, we measure 3cm from V.P. ‘a’, down the horizon line. This point we lightly mark for reference.

- Using the 3cm mark as the starting point, measure the distance to the First Line, in a perpendicular to the horizon. This will create a right triangle between the horizon, the First Line and the perpendicular measured. In my drawing, the distance happens to be 2.5 cm. This is not a set measurement, and it will always be different depending on the angle which the First Line was drawn at.

- The next step is to duplicate those points with exact measurements starting with V.P. ‘b’. This will create an equal, but reversed right triangle with V.P. ‘b’ as the first vertex.

- From V.P. ‘b’, draw the Third Line, using the newly drawn low vertex point as the angular guide. Draw this Third Line such that it crosses through the First and Second Lines. The crossing points with the First and Second Lines we will call Crossing ‘x’ and Crossing ‘y’.

- Measure the distance between Crossing ‘x’ and Crossing ‘y’. My drawing happens to be 4.6 cm. This measurement is relative to the angles of the First and Third lines, and is therefore not a constant measurement.

- Now, we measure that same distance up the First Line, from Crossing ‘y’, towards V.P. ‘a’. Mark the point. Again, my measurement of 4.6 cm is particular to my drawing.

- Draw Fourth Line back from that point to V.P. ‘b’ to complete the perfect laying square.

A Quick Way
There is a quick way to skip essentially from step 2 to step 8, but it involves having a tool with a set 90 degree to trace from (such as a drafting triangle or a t-square). I will outline it here for those with such tools.
- Draw horizon. Choose vanishing points

- Measure length between the two V.P.’s, and half that number. Measure that distance over from one of the V.P.’s to find the mid point between them.

- Drop a 90 degree line down from the centre point, perpendicular to the horizon. Call this point the Centre Vertex

- Draw First and Third Lines from that point to either V.P.’s.

Drawing the Second and Fourth lines will work the same way if you choose a point above or below the Centre Vertex to create different angles.
Conclusion
Now with a laying perfect square in perspective, it is a simple thing to draw the perfect cube from the groundwork we have lain. We will complete this 3 Dimensional cube in the next posting.
