
It is amazing how much information Andrew Loomis packs into each of the pages of his books. His method of instruction is to constantly expand the uses of techniques outlined on previous pages. In so doing, he also expands the learner’s set of drawing mechanics in a straightforward way. For example, on page 39 of Successful Drawing, the method of depth by diagonal is elaborated upon, and here Loomis shows the reader how to use the technique in order to execute a scale drawing. He says:
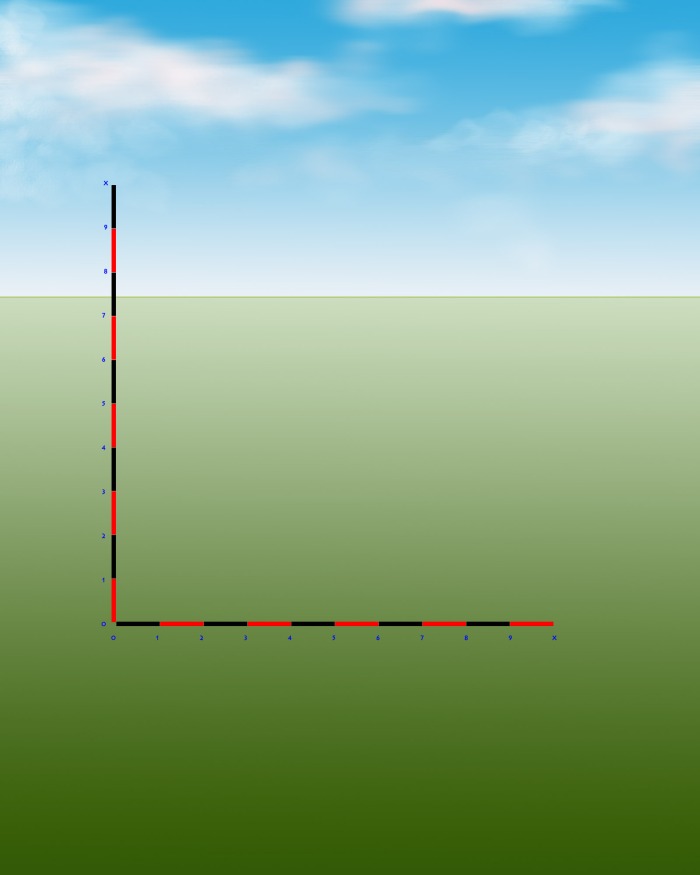
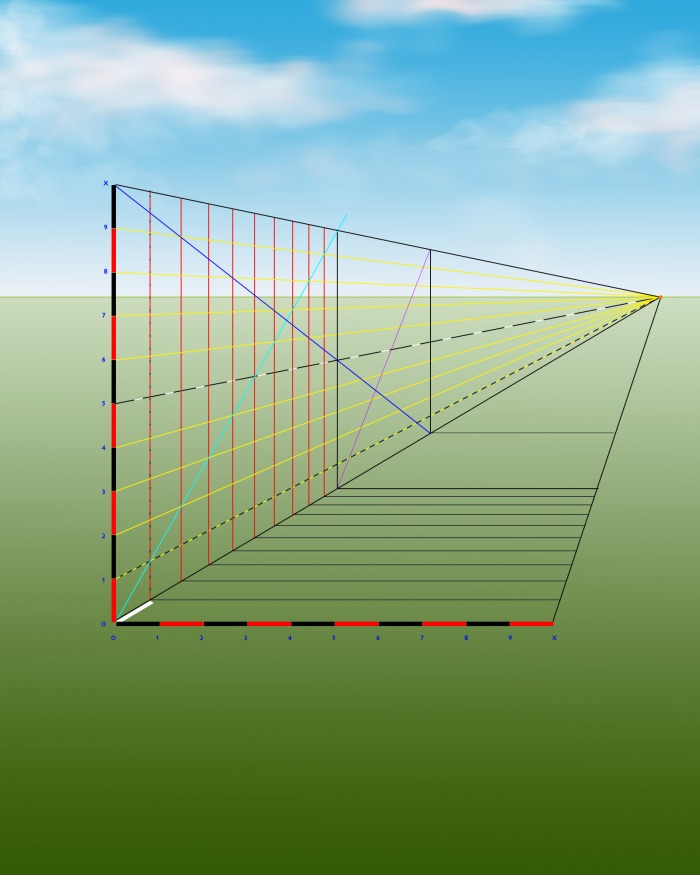
Every artist should know how to draw to a scale. Scale drawings require the division of vertical and horizontal planes into square feet or square units.
Let us then examine the method.
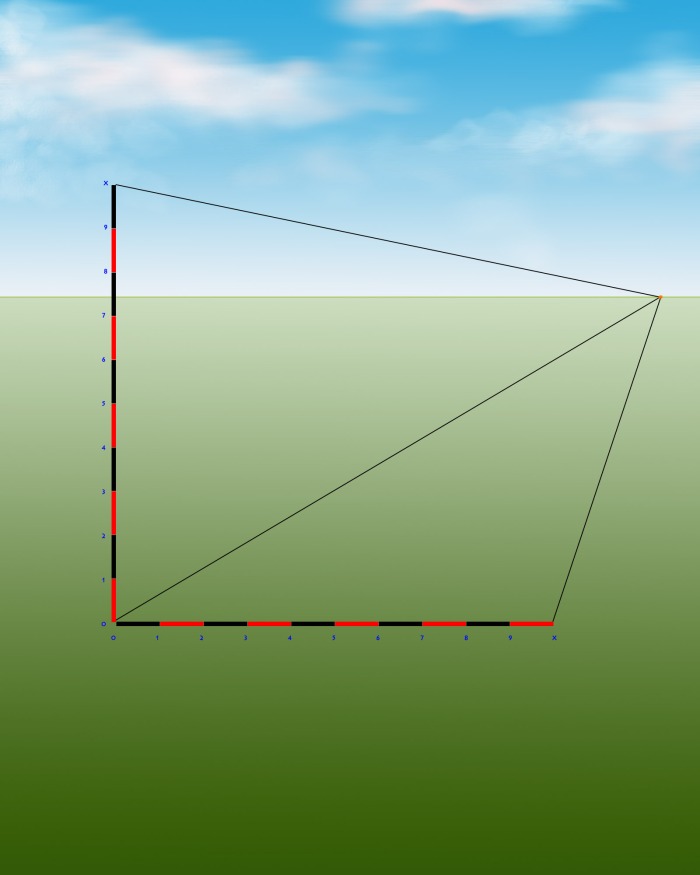
- We must first establish a vertical and horizontal measuring line, like an X and Y axis, where the lines touch at right angles at point zero. Both lines must have equal division of unit, which represent feet in the drawing. The size of the unit which you use is done by eye. A horizon line is established and the measuring lines are placed upon the scene.
- From each of the ends of the measuring lines, and from point zero, lines are drawn to the VP. Set the VP where you want by eye.
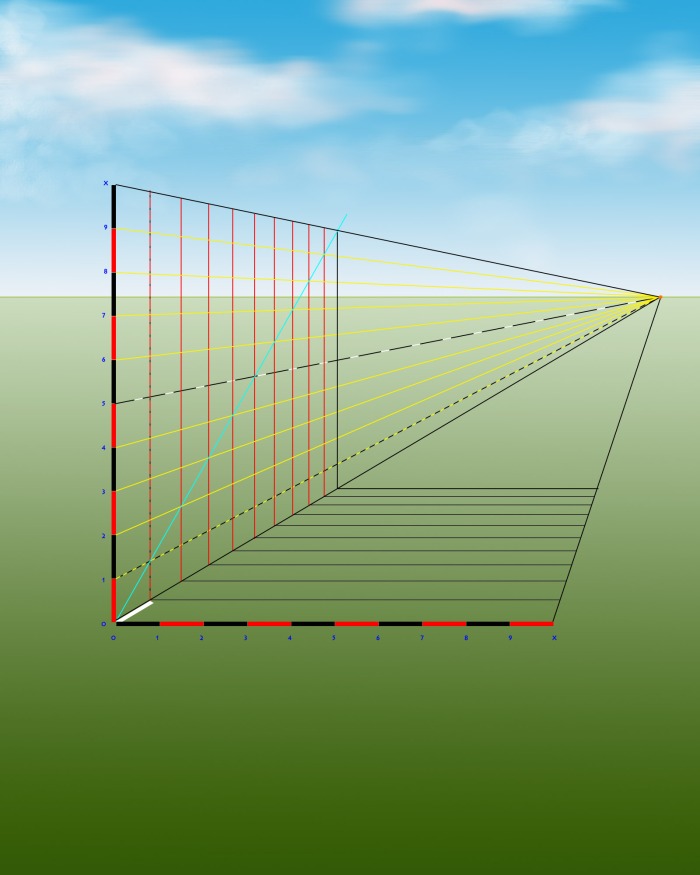
- Now, a fourth Line of Perspective is cast to the VP, this time from the mid point (at the 5) of the vertical line. This line is represented as a black and white dotted line in the example below. We shall call this line the Halfway Line.

- Next, gauge by eye the optional depth of the first foot of measurement along the low Line of Perspective going from the zero point to the VP.

- When the first unit is established, cast a Line of Perspective from point one on the vertical scale (yellow checker in this sample), as well as a second vertical line at the point where the first unit terminates (red checker in this sample). This first square unit will represent one foot.

- Ascending diagonally from the low near corner (point 0, 0), cast a diagonal measurement line (cyan coloured in this sample). Make sure it crosses exactly through the upper furthest corner of the first square foot.

- Where this diagonal measurement line (cyan coloured) crosses the top Line of Perspective, draw another vertical down to the bottom Line of Perspective. This is 10 feet deep into the image from point 0,0. Cast Lines of Perspective (yellow here) from each remaining vertical measurement points to the VP. Where the diagonal (cyan coloured) measurement line crosses the many interior Lines of Perspective (yellow), additional vertical lines are drawn. These represent 1 foot sections receding into the distance.

- Next, draw horizontal lines on the horizontal plane, each at 90 degrees from every incremental foot measurement determined in step 7. This divides the ground plane also into ten 1-foot sections in perspective.
- As in last week’s posting, cast a descending diagonal line from the top near corner of the vertical plane, crossing through the far mid point delineated by the Halfway Line (black and white line) on the plane. This shows where the next ten foot wide plane will terminate.
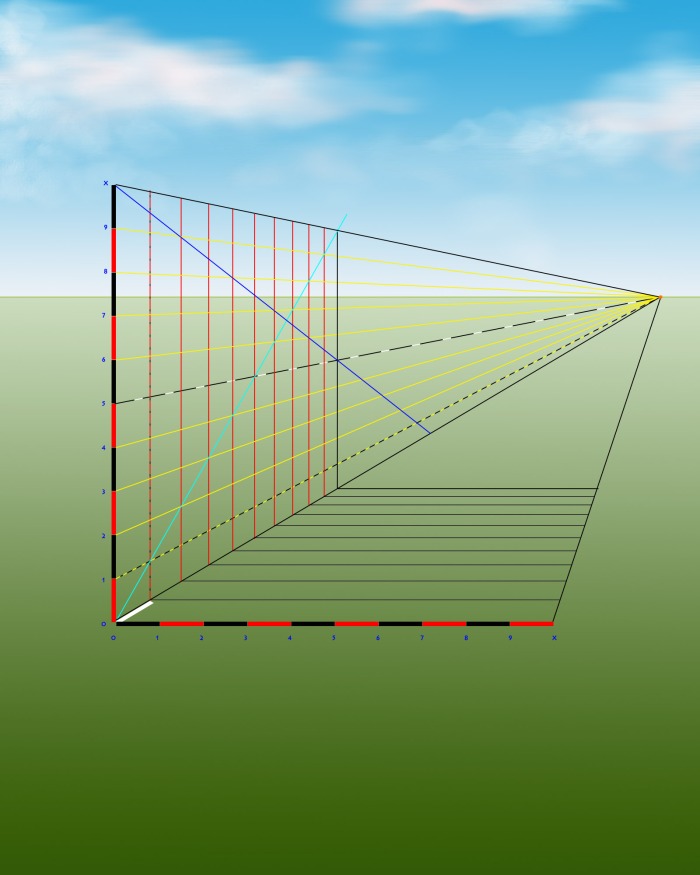
- Draw the vertical for the twenty foot mark, and then diagonally bisect this new plane, from corner to corner (purple diagonal in this sample). Where that diagonal line crosses the Halfway Line is the centre of the second vertical plane.
- At the centre point where the newly drawn diagonal (purple diagonal in this) crosses the Halfway Line, draw a new vertical. This will show the point of 15 feet in depth, as it is exactly between the 10 foot and 20 foot markers.
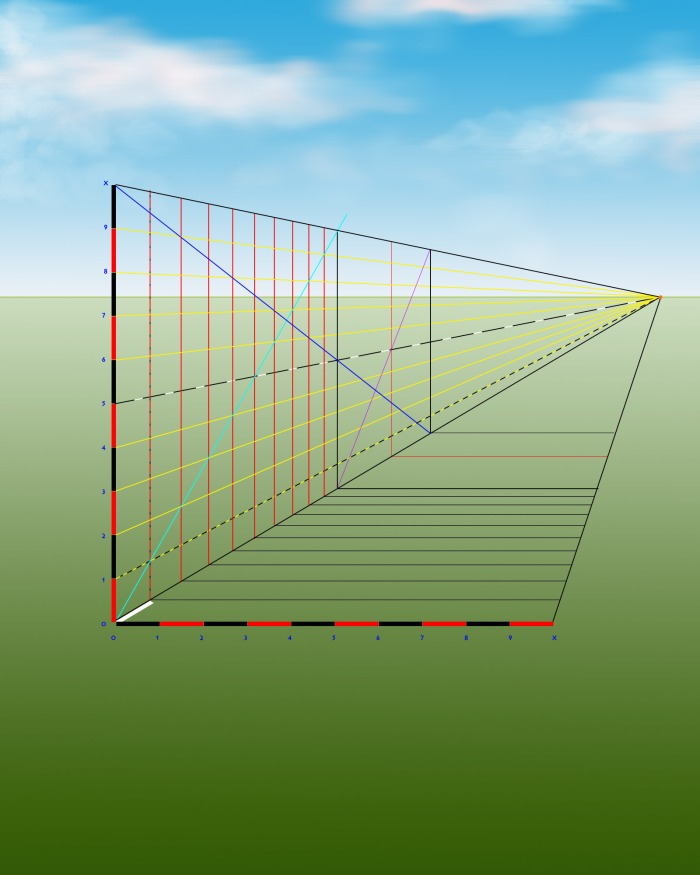
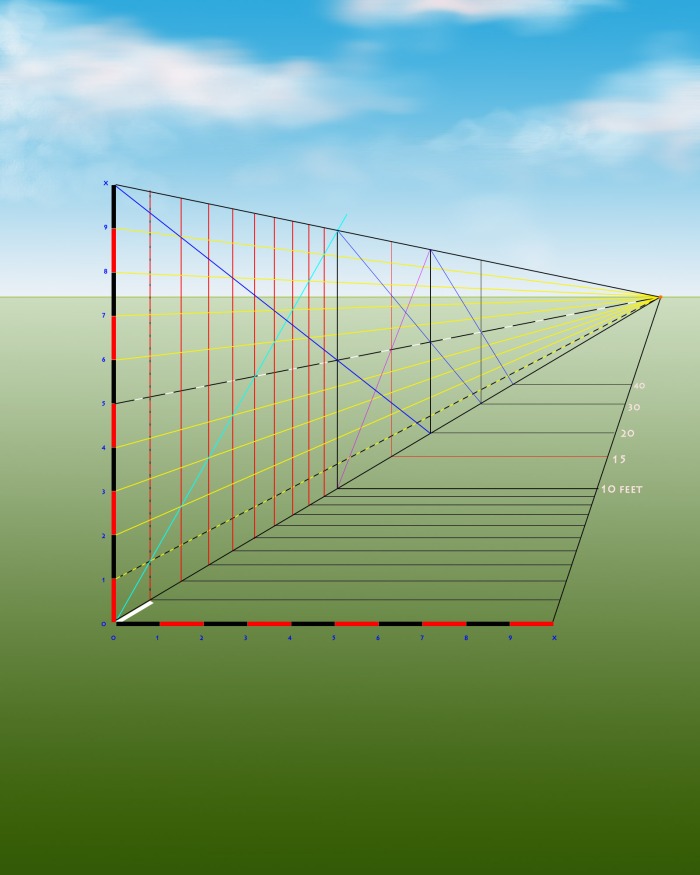
- Repeat this process of descending diagonals from upper near corner through the Halfway Line, and ascending from corner to corner to determine as much depth as needed. Each line that descends from top corner through the Halfway Line shows us 10 more feet in depth.
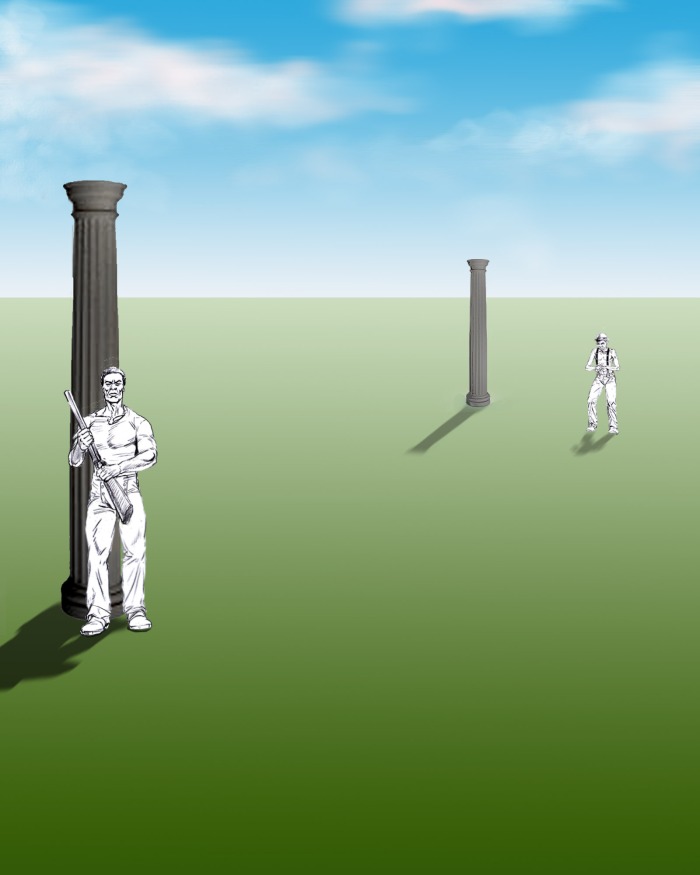
- Now suppose we were asked to place these two men of different heights, on the field 20 feet away from each other. Furthermore, we want to place two Greek columns of equal height also on the plain, 30 feet away from each other. We want to place the tall black man beneath the near column, and the short white man 20 feet behind, and 9.5 feet over to the left of the black man . The black man is 6 feet tall, the white man is 5 feet tall, and the columns are 10 feet tall.

- With this method of Drawing to Scale, the task is simple.
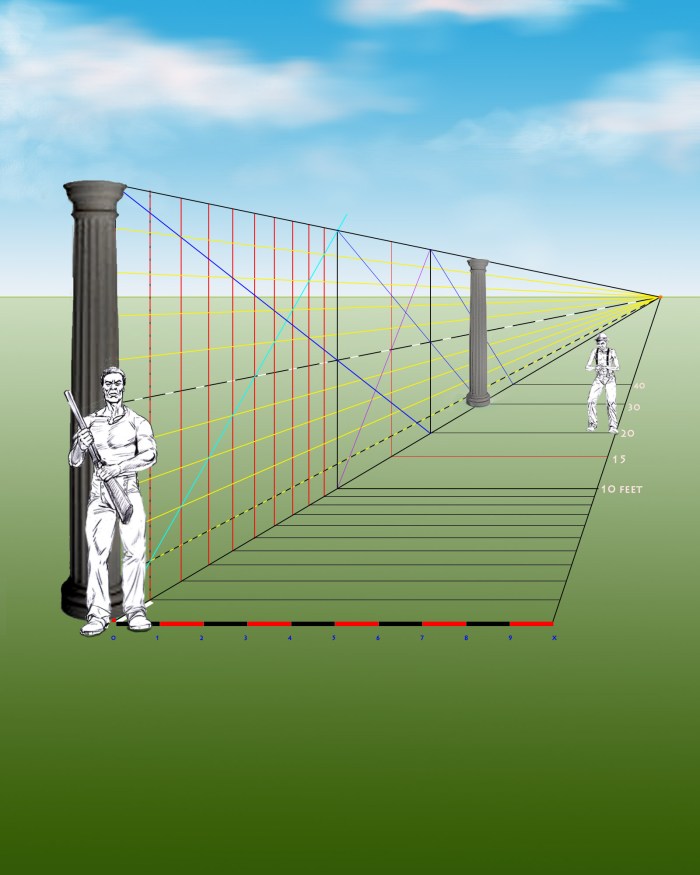
- Erase the guide lines and add some shadows, and the task is complete. Notice how the short white man looks proportionately still like a short guy -even way back in the field. Because the perspective is correct, and our Intelligent Perception is so fine tuned to seeing people in distances, we can tell he is a small man even though he is not standing directly beside any reference point. This is the power of perspective.
Thank you for reading this week’s posting. I hope you will subscribe and learn more about Andrew Loomis by keeping up with this blog.

Just drew this…thanks for posting.
LikeLiked by 1 person
And thank you for reading! This blog is a repository of the notes I have taken after working through each of Andrew Loomis’ books. I post a new entry every Sunday. Currently I am posting on the book Successful Drawing. I have found Loomis to be a very clear thinker and his technical approach to drawing has helped me immensely. I hope you also find my notes useful in your drawing pursuits! Cheers.
LikeLiked by 1 person